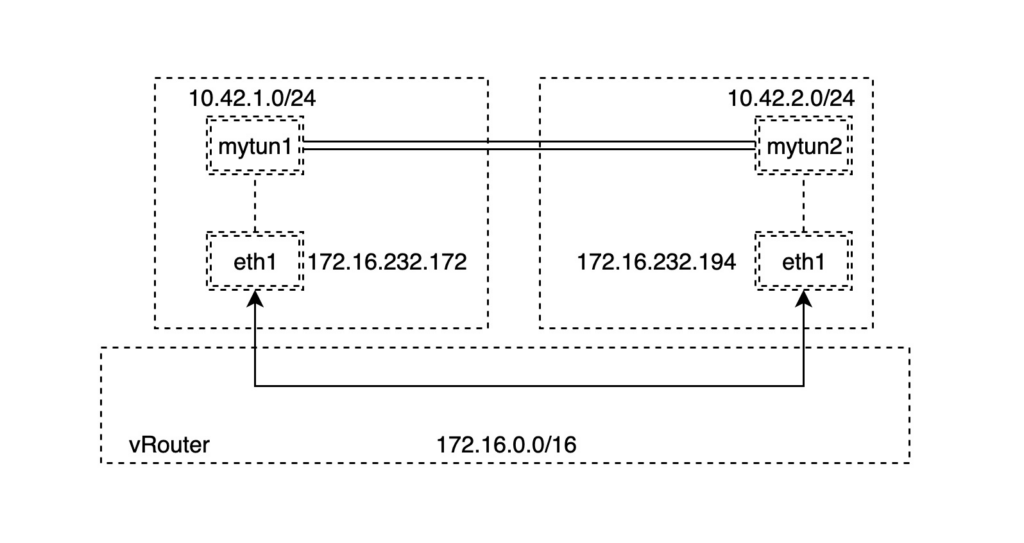
其中有处于在同一个网段172.16.0.0/16的两台主机 A 和 B,因此可以直接联通。我们需要做的是分别在两台主机上创建两个不同的子网:
Note: 实际上,这两台主机 A 和 B 不必处于同一个子网,只要处于同一个三层可路由的网络之中,也就是说能通过三层网络路由得到就可以完成 IPIP 隧道的搭建。
Plain text
Copy to clipboard
Open code in new window
EnlighterJS 3 Syntax Highlighter
A: 10.42.1.0/24
B: 10.42.2.0/24
A: 10.42.1.0/24
B: 10.42.2.0/24
A: 10.42.1.0/24
B: 10.42.2.0/24
为了简化,我们先在 A 节点上创建 bridge 网络设备 mybr0,并且设置 IP 地址为10.42.1.0/24子网的网关地址,也就是10.42.1.1/24,然后启用 mybr0 网桥设备:
Plain text
Copy to clipboard
Open code in new window
EnlighterJS 3 Syntax Highlighter
# ip link add name mybr0 type bridge
# ip addr add 10.42.1.1/24 dev mybr0
# ip link set dev mybr0 up
# ip link add name mybr0 type bridge
# ip addr add 10.42.1.1/24 dev mybr0
# ip link set dev mybr0 up
# ip link add name mybr0 type bridge
# ip addr add 10.42.1.1/24 dev mybr0
# ip link set dev mybr0 up
类似地,然后在 B 节点上也执行类似的操作,但是子网地址为10.42.2.0/24:
Plain text
Copy to clipboard
Open code in new window
EnlighterJS 3 Syntax Highlighter
# ip link add name mybr0 type bridge
# ip addr add 10.42.2.1/24 dev mybr0
# ip link set dev mybr0 up
# ip link add name mybr0 type bridge
# ip addr add 10.42.2.1/24 dev mybr0
# ip link set dev mybr0 up
# ip link add name mybr0 type bridge
# ip addr add 10.42.2.1/24 dev mybr0
# ip link set dev mybr0 up
接下来,我们分别在 A 和 B 节点上
创建对应的 TUN 网络设备
设置对应的 local 和 remote 地址为节点的可路由地址
设置对应的网关地址分别为我们即将创建的 TUN 网络设备
启用 TUN 网络设备来创建 IPIP 隧道
Note: 步骤3是为了节省简化我们创建子网的步骤,直接设置网关地址就可以不用创建额外的网络设备。
A:
Plain text
Copy to clipboard
Open code in new window
EnlighterJS 3 Syntax Highlighter
# modprobe ipip
# ip tunnel add tunl0 mode ipip remote 172.16.232.194 local 172.16.232.172
# ip addr add 10.42.1.1/24 dev tunl0
# ip link set tunl0 up
# modprobe ipip
# ip tunnel add tunl0 mode ipip remote 172.16.232.194 local 172.16.232.172
# ip addr add 10.42.1.1/24 dev tunl0
# ip link set tunl0 up
# modprobe ipip
# ip tunnel add tunl0 mode ipip remote 172.16.232.194 local 172.16.232.172
# ip addr add 10.42.1.1/24 dev tunl0
# ip link set tunl0 up
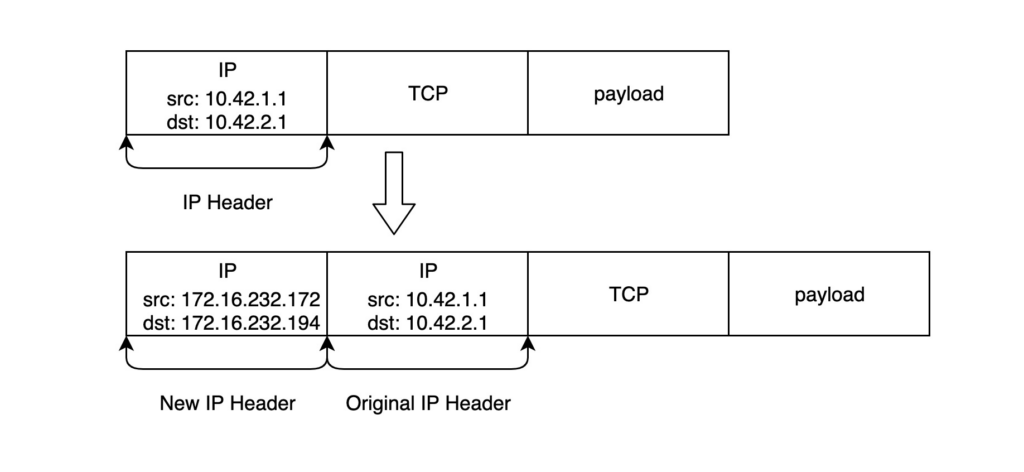
通过上面的命令我们创建了新的隧道设备 tunl0 并且设置了隧道的 remote 和 local 的IP地址,这是 IPIP 数据包的外层地址;对于内层地址,我们分别设置两个子网地址,这样,IPIP 数据包就会如下图所示:
B:
Plain text
Copy to clipboard
Open code in new window
EnlighterJS 3 Syntax Highlighter
# modprobe ipip
# ip tunnel add tunl0 mode ipip remote 172.16.232.172 local 172.16.232.194
# ip addr add 10.42.2.1/24 dev tunl0
# ip link set tunl0 up
# modprobe ipip
# ip tunnel add tunl0 mode ipip remote 172.16.232.172 local 172.16.232.194
# ip addr add 10.42.2.1/24 dev tunl0
# ip link set tunl0 up
# modprobe ipip
# ip tunnel add tunl0 mode ipip remote 172.16.232.172 local 172.16.232.194
# ip addr add 10.42.2.1/24 dev tunl0
# ip link set tunl0 up
为了保证我们通过创建的 IPIP 隧道来访问两个不同主机上的子网,我们需要手动添加如下静态路由:
A:
Plain text
Copy to clipboard
Open code in new window
EnlighterJS 3 Syntax Highlighter
# ip route add 10.42.2.0/24 dev tunl0
# ip route add 10.42.2.0/24 dev tunl0
# ip route add 10.42.2.0/24 dev tunl0
B:
Plain text
Copy to clipboard
Open code in new window
EnlighterJS 3 Syntax Highlighter
# ip route add 10.42.1.0/24 dev tunl0
# ip route add 10.42.1.0/24 dev tunl0
# ip route add 10.42.1.0/24 dev tunl0
现在主机 AB 的路由表如下所示:
A:
Plain text
Copy to clipboard
Open code in new window
EnlighterJS 3 Syntax Highlighter
# ip route show
default via 172.16.200.51 dev ens3
10.42.1.0/24 dev tunl0 proto kernel scope link src 10.42.1.1
10.42.2.0/24 dev tunl0 scope link
172.16.0.0/16 dev ens3 proto kernel scope link src 172.16.232.172
# ip route show
default via 172.16.200.51 dev ens3
10.42.1.0/24 dev tunl0 proto kernel scope link src 10.42.1.1
10.42.2.0/24 dev tunl0 scope link
172.16.0.0/16 dev ens3 proto kernel scope link src 172.16.232.172
# ip route show
default via 172.16.200.51 dev ens3
10.42.1.0/24 dev tunl0 proto kernel scope link src 10.42.1.1
10.42.2.0/24 dev tunl0 scope link
172.16.0.0/16 dev ens3 proto kernel scope link src 172.16.232.172
B:
Plain text
Copy to clipboard
Open code in new window
EnlighterJS 3 Syntax Highlighter
# ip route show
default via 172.16.200.51 dev ens3
10.42.1.0/24 dev tunl0 scope link
10.42.2.0/24 dev tunl0 proto kernel scope link src 10.42.2.1
172.16.0.0/16 dev ens3 proto kernel scope link src 172.16.232.194
# ip route show
default via 172.16.200.51 dev ens3
10.42.1.0/24 dev tunl0 scope link
10.42.2.0/24 dev tunl0 proto kernel scope link src 10.42.2.1
172.16.0.0/16 dev ens3 proto kernel scope link src 172.16.232.194
# ip route show
default via 172.16.200.51 dev ens3
10.42.1.0/24 dev tunl0 scope link
10.42.2.0/24 dev tunl0 proto kernel scope link src 10.42.2.1
172.16.0.0/16 dev ens3 proto kernel scope link src 172.16.232.194
到此我们就可以开始验证 IPIP 隧道是否正常工作:
A:
Plain text
Copy to clipboard
Open code in new window
EnlighterJS 3 Syntax Highlighter
# ping 10.42.2.1 -c 2
PING 10.42.2.1(10.42.2.1)56(84) bytes of data.
64 bytes from 10.42.2.1: icmp_seq=1 ttl=64 time=0.269 ms
64 bytes from 10.42.2.1: icmp_seq=2 ttl=64 time=0.303 ms
--- 10.42.2.1 ping statistics ---
2 packets transmitted, 2 received, 0% packet loss, time 1013ms
rtt min/avg/max/mdev = 0.269/0.286/0.303/0.017 ms
# ping 10.42.2.1 -c 2
PING 10.42.2.1 (10.42.2.1) 56(84) bytes of data.
64 bytes from 10.42.2.1: icmp_seq=1 ttl=64 time=0.269 ms
64 bytes from 10.42.2.1: icmp_seq=2 ttl=64 time=0.303 ms
--- 10.42.2.1 ping statistics ---
2 packets transmitted, 2 received, 0% packet loss, time 1013ms
rtt min/avg/max/mdev = 0.269/0.286/0.303/0.017 ms
B:
Plain text
Copy to clipboard
Open code in new window
EnlighterJS 3 Syntax Highlighter
# ping 10.42.1.1 -c 2
PING 10.42.1.1(10.42.1.1)56(84) bytes of data.
64 bytes from 10.42.1.1: icmp_seq=1 ttl=64 time=0.214 ms
64 bytes from 10.42.1.1: icmp_seq=2 ttl=64 time=3.27 ms
--- 10.42.1.1 ping statistics ---
2 packets transmitted, 2 received, 0% packet loss, time 1021ms
rtt min/avg/max/mdev = 0.214/1.745/3.277/1.532 ms
# ping 10.42.1.1 -c 2
PING 10.42.1.1 (10.42.1.1) 56(84) bytes of data.
64 bytes from 10.42.1.1: icmp_seq=1 ttl=64 time=0.214 ms
64 bytes from 10.42.1.1: icmp_seq=2 ttl=64 time=3.27 ms
--- 10.42.1.1 ping statistics ---
2 packets transmitted, 2 received, 0% packet loss, time 1021ms
rtt min/avg/max/mdev = 0.214/1.745/3.277/1.532 ms
是的,可以 ping 通,我们通过 tcpdump 命令在 TUN 设备抓取数据:
Plain text
Copy to clipboard
Open code in new window
EnlighterJS 3 Syntax Highlighter
# tcpdump -n -i tunl0
tcpdump: verbose output suppressed, use -v or -vv for full protocol decode
listening on tunl0, link-type RAW(Raw IP), capture size 262144 bytes
01:32:05.486835 IP 10.42.1.1>10.42.2.1: ICMP echo request, id 3460, seq 1, length 64
01:32:05.486868 IP 10.42.2.1>10.42.1.1: ICMP echo reply, id 3460, seq 1, length 64
01:32:06.509617 IP 10.42.1.1>10.42.2.1: ICMP echo request, id 3460, seq 2, length 64
01:32:06.509668 IP 10.42.2.1>10.42.1.1: ICMP echo reply, id 3460, seq 2, length 64
# tcpdump -n -i tunl0
tcpdump: verbose output suppressed, use -v or -vv for full protocol decode
listening on tunl0, link-type RAW (Raw IP), capture size 262144 bytes
01:32:05.486835 IP 10.42.1.1 > 10.42.2.1: ICMP echo request, id 3460, seq 1, length 64
01:32:05.486868 IP 10.42.2.1 > 10.42.1.1: ICMP echo reply, id 3460, seq 1, length 64
01:32:06.509617 IP 10.42.1.1 > 10.42.2.1: ICMP echo request, id 3460, seq 2, length 64
01:32:06.509668 IP 10.42.2.1 > 10.42.1.1: ICMP echo reply, id 3460, seq 2, length 64
到此为止,我们的实验是成功的。但是需要注意的是,如果我们使用的是 gre 模式,有可能需要设置防火墙才能让两个子网互通,这种情况在搭建 IPv6 隧道较为常见。
one-to-many
上一节中我们通过指定 TUN 设备的 local 地址和 remote 地址创建了一个一对一的 IPIP 隧道,实际上,在创建 IPIP 隧道的时候完全可以不指定 remote 地址,只要在 TUN 设备上增加对应的路由,IPIP 隧道就知道如何封装新的 IP 数据包并发送到路由指定的目标地址。
与上一小节不同的是,我们没有直接将子网的网关地址设置为 TUN 设备的 IP 地址,而是创建额外的 bridge 网络设备以模拟实际常用的容器网络模型。我们在 A 节点上创建 bridge 网络设备 mybr0,并且设置 IP 地址为 10.42.1.0/24 子网的网关地址,然后启用 mybr0:
Plain text
Copy to clipboard
Open code in new window
EnlighterJS 3 Syntax Highlighter
# ip link add name mybr0 type bridge
# ip addr add 10.42.1.1/24 dev mybr0
# ip link set dev mybr0 up
# ip link add name mybr0 type bridge
# ip addr add 10.42.1.1/24 dev mybr0
# ip link set dev mybr0 up
# ip link add name mybr0 type bridge
# ip addr add 10.42.1.1/24 dev mybr0
# ip link set dev mybr0 up
然后在 B 和 C 节点上分别执行类似的操作:
B:
Plain text
Copy to clipboard
Open code in new window
EnlighterJS 3 Syntax Highlighter
# ip link add name mybr0 type bridge
# ip addr add 10.42.2.1/24 dev mybr0
# ip link set dev mybr0 up
# ip link add name mybr0 type bridge
# ip addr add 10.42.2.1/24 dev mybr0
# ip link set dev mybr0 up
# ip link add name mybr0 type bridge
# ip addr add 10.42.2.1/24 dev mybr0
# ip link set dev mybr0 up
C:
Plain text
Copy to clipboard
Open code in new window
EnlighterJS 3 Syntax Highlighter
# ip link add name mybr0 type bridge
# ip addr add 10.42.3.1/24 dev mybr0
# ip link set dev mybr0 up
# ip link add name mybr0 type bridge
# ip addr add 10.42.3.1/24 dev mybr0
# ip link set dev mybr0 up
# ip link add name mybr0 type bridge
# ip addr add 10.42.3.1/24 dev mybr0
# ip link set dev mybr0 up
我们的最终目标是在三个节点之间分别俩俩搭建 IPIP 隧道来保证这三个不同的子网直接能够互相通信,因此下一步是创建 TUN 网络设备并且设置路由信息,分别在A和B两台节点上:
创建对应的 TUN 网络设备并启用
设置 TUN 网络设备的 IP 地址
设置到不同子网的路由,指明下一跳的地址
对应的网关地址分别为我们即将创建的 TUN 网络设备
启用 TUN 网络设备来创建 IPIP 隧道
Note: TUN 网络设备的 IP 地址是对应节点的子网地址,但是子网掩码是32位的,例如 A 节点上子网地址是10.42.1.0/24,A 节点上的 TUN 网络设备的 IP 地址是10.42.1.0/32。这样做的原因是有时候同一个子网(例如10.42.1.0/24)的地址会分配相同的 MAC 地址,因此不能通过二层的链路层直接通信,而如果保证 TUN 网络设备的 IP 地址和任何地址都不在同一个子网,也就不存在二层的链路层直接通信了。关于这点请参考 Calico 的实现原理,每个容器会有相同的 MAC 地址,后面我们有机会在深入探究。
Note: 还有一点需要注意,给 TUN 网络设备设置路由的时候指定了 onlink 参数, 目的是保证下一跳是直接到该 TUN 网络设备,这样即使节点之间不在同一个子网中也可以搭建 IPIP 隧道。
A:
Plain text
Copy to clipboard
Open code in new window
EnlighterJS 3 Syntax Highlighter
# modprobe ipip
# ip tunnel add tunl0 mode ipip
# ip link set tunl0 up
# ip addr add 10.42.1.0/32 dev tunl0
# ip route add 10.42.2.0/24 via 172.16.165.244 dev tunl0 onlink
# ip route add 10.42.3.0/24 via 172.16.168.113 dev tunl0 onlink
# modprobe ipip
# ip tunnel add tunl0 mode ipip
# ip link set tunl0 up
# ip addr add 10.42.1.0/32 dev tunl0
# ip route add 10.42.2.0/24 via 172.16.165.244 dev tunl0 onlink
# ip route add 10.42.3.0/24 via 172.16.168.113 dev tunl0 onlink
# modprobe ipip
# ip tunnel add tunl0 mode ipip
# ip link set tunl0 up
# ip addr add 10.42.1.0/32 dev tunl0
# ip route add 10.42.2.0/24 via 172.16.165.244 dev tunl0 onlink
# ip route add 10.42.3.0/24 via 172.16.168.113 dev tunl0 onlink
B:
Plain text
Copy to clipboard
Open code in new window
EnlighterJS 3 Syntax Highlighter
# modprobe ipip
# ip tunnel add tunl0 mode ipip
# ip link set tunl0 up
# ip addr add 10.42.2.0/32 dev tunl0
# ip route add 10.42.1.0/24 via 172.16.165.33 dev tunl0 onlink
# ip route add 10.42.3.0/24 via 172.16.168.113 dev tunl0 onlink
# modprobe ipip
# ip tunnel add tunl0 mode ipip
# ip link set tunl0 up
# ip addr add 10.42.2.0/32 dev tunl0
# ip route add 10.42.1.0/24 via 172.16.165.33 dev tunl0 onlink
# ip route add 10.42.3.0/24 via 172.16.168.113 dev tunl0 onlink
# modprobe ipip
# ip tunnel add tunl0 mode ipip
# ip link set tunl0 up
# ip addr add 10.42.2.0/32 dev tunl0
# ip route add 10.42.1.0/24 via 172.16.165.33 dev tunl0 onlink
# ip route add 10.42.3.0/24 via 172.16.168.113 dev tunl0 onlink
C:
Plain text
Copy to clipboard
Open code in new window
EnlighterJS 3 Syntax Highlighter
# modprobe ipip
# ip tunnel add tunl0 mode ipip
# ip link set tunl0 up
# ip addr add 10.42.3.0/32 dev tunl0
# ip route add 10.42.1.0/24 via 172.16.165.33 dev tunl0 onlink
# ip route add 10.42.2.0/24 via 172.16.165.244 dev tunl0 onlink
# modprobe ipip
# ip tunnel add tunl0 mode ipip
# ip link set tunl0 up
# ip addr add 10.42.3.0/32 dev tunl0
# ip route add 10.42.1.0/24 via 172.16.165.33 dev tunl0 onlink
# ip route add 10.42.2.0/24 via 172.16.165.244 dev tunl0 onlink
# modprobe ipip
# ip tunnel add tunl0 mode ipip
# ip link set tunl0 up
# ip addr add 10.42.3.0/32 dev tunl0
# ip route add 10.42.1.0/24 via 172.16.165.33 dev tunl0 onlink
# ip route add 10.42.2.0/24 via 172.16.165.244 dev tunl0 onlink
到此我们就可以开始验证我们搭建的 IPIP 隧道是否正常工作:
A:
Plain text
Copy to clipboard
Open code in new window
EnlighterJS 3 Syntax Highlighter
# try to ping IP in 10.42.2.0/24 on Node B
# ping 10.42.2.1 -c 2
PING 10.42.2.1(10.42.2.1)56(84) bytes of data.
64 bytes from 10.42.2.1: icmp_seq=1 ttl=64 time=0.338 ms
64 bytes from 10.42.2.1: icmp_seq=2 ttl=64 time=0.302 ms
--- 10.42.2.1 ping statistics ---
2 packets transmitted, 2 received, 0% packet loss, time 1028ms
rtt min/avg/max/mdev = 0.302/0.320/0.338/0.018 ms
...
# try to ping IP in 10.42.3.0/24 on Node C
# ping 10.42.3.1 -c 2
PING 10.42.3.1(10.42.3.1)56(84) bytes of data.
64 bytes from 10.42.3.1: icmp_seq=1 ttl=64 time=0.315 ms
64 bytes from 10.42.3.1: icmp_seq=2 ttl=64 time=0.381 ms
--- 10.42.3.1 ping statistics ---
2 packets transmitted, 2 received, 0% packet loss, time 1029ms
rtt min/avg/max/mdev = 0.315/0.348/0.381/0.033 ms
# try to ping IP in 10.42.2.0/24 on Node B
# ping 10.42.2.1 -c 2
PING 10.42.2.1 (10.42.2.1) 56(84) bytes of data.
64 bytes from 10.42.2.1: icmp_seq=1 ttl=64 time=0.338 ms
64 bytes from 10.42.2.1: icmp_seq=2 ttl=64 time=0.302 ms

--- 10.42.2.1 ping statistics ---
2 packets transmitted, 2 received, 0% packet loss, time 1028ms
rtt min/avg/max/mdev = 0.302/0.320/0.338/0.018 ms
...
# try to ping IP in 10.42.3.0/24 on Node C
# ping 10.42.3.1 -c 2
PING 10.42.3.1 (10.42.3.1) 56(84) bytes of data.
64 bytes from 10.42.3.1: icmp_seq=1 ttl=64 time=0.315 ms
64 bytes from 10.42.3.1: icmp_seq=2 ttl=64 time=0.381 ms

--- 10.42.3.1 ping statistics ---
2 packets transmitted, 2 received, 0% packet loss, time 1029ms
rtt min/avg/max/mdev = 0.315/0.348/0.381/0.033 ms
# try to ping IP in 10.42.2.0/24 on Node B
# ping 10.42.2.1 -c 2
PING 10.42.2.1 (10.42.2.1) 56(84) bytes of data.
64 bytes from 10.42.2.1: icmp_seq=1 ttl=64 time=0.338 ms
64 bytes from 10.42.2.1: icmp_seq=2 ttl=64 time=0.302 ms
--- 10.42.2.1 ping statistics ---
2 packets transmitted, 2 received, 0% packet loss, time 1028ms
rtt min/avg/max/mdev = 0.302/0.320/0.338/0.018 ms
...
# try to ping IP in 10.42.3.0/24 on Node C
# ping 10.42.3.1 -c 2
PING 10.42.3.1 (10.42.3.1) 56(84) bytes of data.
64 bytes from 10.42.3.1: icmp_seq=1 ttl=64 time=0.315 ms
64 bytes from 10.42.3.1: icmp_seq=2 ttl=64 time=0.381 ms
--- 10.42.3.1 ping statistics ---
2 packets transmitted, 2 received, 0% packet loss, time 1029ms
rtt min/avg/max/mdev = 0.315/0.348/0.381/0.033 ms
看起来一切正常,如果反过来从 B 或 C 节点分别 ping 其他子网,也是可以通的。这就说明我们确实可以创建一对多的 IPIP 隧道,一对多的 IPIP 隧道模式在一些典型的多节点网络中创建 overlay 通信模型中非常有用。
under the hood
我们再通过 tcpdump 命令在分别在 B 和 C 的 TUN 设备抓取数据:
B:
Plain text
Copy to clipboard
Open code in new window
EnlighterJS 3 Syntax Highlighter
# tcpdump -n -i tunl0
tcpdump: verbose output suppressed, use -v or -vv for full protocol decode
listening on tunl0, link-type RAW(Raw IP), capture size 262144 bytes
22:38:28.268089 IP 10.42.1.0>10.42.2.1: ICMP echo request, id 6026, seq 1, length 64
22:38:28.268125 IP 10.42.2.1>10.42.1.0: ICMP echo reply, id 6026, seq 1, length 64
22:38:29.285595 IP 10.42.1.0>10.42.2.1: ICMP echo request, id 6026, seq 2, length 64
22:38:29.285629 IP 10.42.2.1>10.42.1.0: ICMP echo reply, id 6026, seq 2, length 64
# tcpdump -n -i tunl0
tcpdump: verbose output suppressed, use -v or -vv for full protocol decode
listening on tunl0, link-type RAW (Raw IP), capture size 262144 bytes
22:38:28.268089 IP 10.42.1.0 > 10.42.2.1: ICMP echo request, id 6026, seq 1, length 64
22:38:28.268125 IP 10.42.2.1 > 10.42.1.0: ICMP echo reply, id 6026, seq 1, length 64
22:38:29.285595 IP 10.42.1.0 > 10.42.2.1: ICMP echo request, id 6026, seq 2, length 64
22:38:29.285629 IP 10.42.2.1 > 10.42.1.0: ICMP echo reply, id 6026, seq 2, length 64
C:
Plain text
Copy to clipboard
Open code in new window
EnlighterJS 3 Syntax Highlighter
# tcpdump -n -i tunl0
tcpdump: verbose output suppressed, use -v or -vv for full protocol decode
listening on tunl0, link-type RAW(Raw IP), capture size 262144 bytes
22:36:18.236446 IP 10.42.1.0>10.42.3.1: ICMP echo request, id 5894, seq 1, length 64
22:36:18.236499 IP 10.42.3.1>10.42.1.0: ICMP echo reply, id 5894, seq 1, length 64
22:36:19.265946 IP 10.42.1.0>10.42.3.1: ICMP echo request, id 5894, seq 2, length 64
22:36:19.265997 IP 10.42.3.1>10.42.1.0: ICMP echo reply, id 5894, seq 2, length 64
# tcpdump -n -i tunl0
tcpdump: verbose output suppressed, use -v or -vv for full protocol decode
listening on tunl0, link-type RAW (Raw IP), capture size 262144 bytes
22:36:18.236446 IP 10.42.1.0 > 10.42.3.1: ICMP echo request, id 5894, seq 1, length 64
22:36:18.236499 IP 10.42.3.1 > 10.42.1.0: ICMP echo reply, id 5894, seq 1, length 64
22:36:19.265946 IP 10.42.1.0 > 10.42.3.1: ICMP echo request, id 5894, seq 2, length 64
22:36:19.265997 IP 10.42.3.1 > 10.42.1.0: ICMP echo reply, id 5894, seq 2, length 64
其实,从创建一对多的 IPIP 隧道的过程中我们就能大致猜到 Linux 的 ipip 模块基于路由信息获取 IPIP 包的内部 IP 然后再用外部 IP 封装成新的 IP 数据包。至于怎么解封 IPIP 数据包的呢?我们来看看 ipip 模块收数据包的过程:
Plain text
Copy to clipboard
Open code in new window
EnlighterJS 3 Syntax Highlighter
voidip_protocol_deliver_rcu(struct net *net, struct sk_buff *skb, int protocol)